How To Delay Auto Starting Virtual Machines In VMWare Server Running multiple Operating Systems as Virtual Machines has numerous advantages, until it comes time to reboot the Host Computer (running VMWare Server). You either need to manually start all VM's or allow them to startup at once causing a system wide bottleneck to occur on the Host.
Instead of trying to start up all VM's at once, you can configure VMWare Server to delay the startup times for each Virtual Machine, and specify the order in which each VM starts. In fact, an option also exist to auto shutdown each VM in a delayed ordered, making way for a more responsive Host during reboots.
For reasons unknown, you cannot configure delayed starting and shutdown of VM's using VMWare Server Console. Instead you need to use the web based VMWare Management Interface (VMI).
The Management Interface is installed during VMWare Server installation if it detects a Web Server (Apache or IIS) is installed. It can also be installed later by running VMWare Server setup again.
NOTE: if VMWare Management Interface will not connect when using IIS on Windows XP or Vista, see starting the VMWare web service.
Once you have VMWare web service up and running, you can connect and logon to the interface by typing the following in your browser:
https://:8333 (or https://localhost/:8333 when using the VMWare Host Computer)
If SSL is disabled, connect with
http://:8222
Enable Startup And Shutdown
Now that you are connected, first verify that all VM's Startup and Shutdown parameter have been enable (VM must be powered off to enable).
This can be set in the VMI by clicking on the down arrow (next to the VM icon),

followed by:
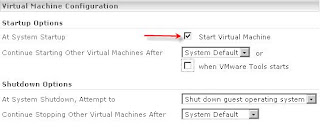
- Selecting Configure Options… - Click on Edit next to System Startup Options - Check Start Virtual Machine (set all other options as shown in below screenshot including Shutdown Options) - Click OK to save settingsNOTE: you can also set the delay time here, but as you will see later, it is much easier to set in the global System configuration section.
Setup Startup And Shutdown Delay Times
Once Startup and Shutdown has been enable for each VM, you can now set up the order and delay times by:
- Clicking on the Options tab from the main screen in VMI. Then click on Virtual Machine Startup and Shutdown… link.

- Followed by clicking on the Edit button in the System Configuration section.
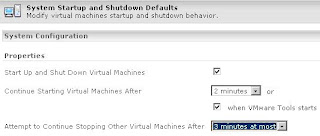
In the System Startup and Shutdown Defaults screen, enable startup and shutdown by selecting the check box and set the delay times to your preference. Click OK to save settings.
Next set the order of starting each Virtual Machine, by editing the Specified Order or Any Order. Click OK to save settings.
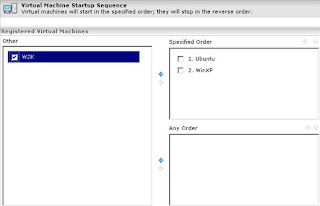
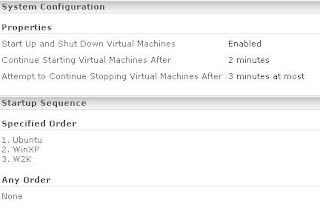
Virtual Machines will shutdown in the reverse order you have configured for startup. When completed with the setup, you will see a summary of the settings and startup sequence similar to the below screen shot.
Now your VMWare Server host will more than likely see less bottlenecks and quicker startup and shutdown times. Also, with a graceful shutdown, your Virtual Machines will be less likely get corrupted from a hard shutdown (power off).
You can setup this option by editing the configuration file, Please refer the VMWare Article:
Instead of trying to start up all VM's at once, you can configure VMWare Server to delay the startup times for each Virtual Machine, and specify the order in which each VM starts. In fact, an option also exist to auto shutdown each VM in a delayed ordered, making way for a more responsive Host during reboots.
For reasons unknown, you cannot configure delayed starting and shutdown of VM's using VMWare Server Console. Instead you need to use the web based VMWare Management Interface (VMI).
The Management Interface is installed during VMWare Server installation if it detects a Web Server (Apache or IIS) is installed. It can also be installed later by running VMWare Server setup again.
NOTE: if VMWare Management Interface will not connect when using IIS on Windows XP or Vista, see starting the VMWare web service.
Once you have VMWare web service up and running, you can connect and logon to the interface by typing the following in your browser:
https://
If SSL is disabled, connect with
http://
Enable Startup And Shutdown
Now that you are connected, first verify that all VM's Startup and Shutdown parameter have been enable (VM must be powered off to enable).
This can be set in the VMI by clicking on the down arrow (next to the VM icon),

followed by:
- Selecting Configure Options… - Click on Edit next to System Startup Options - Check Start Virtual Machine (set all other options as shown in below screenshot including Shutdown Options) - Click OK to save settingsNOTE: you can also set the delay time here, but as you will see later, it is much easier to set in the global System configuration section.

Setup Startup And Shutdown Delay Times
Once Startup and Shutdown has been enable for each VM, you can now set up the order and delay times by:
- Clicking on the Options tab from the main screen in VMI. Then click on Virtual Machine Startup and Shutdown… link.

- Followed by clicking on the Edit button in the System Configuration section.
In the System Startup and Shutdown Defaults screen, enable startup and shutdown by selecting the check box and set the delay times to your preference. Click OK to save settings.

Next set the order of starting each Virtual Machine, by editing the Specified Order or Any Order. Click OK to save settings.

Virtual Machines will shutdown in the reverse order you have configured for startup. When completed with the setup, you will see a summary of the settings and startup sequence similar to the below screen shot.

Now your VMWare Server host will more than likely see less bottlenecks and quicker startup and shutdown times. Also, with a graceful shutdown, your Virtual Machines will be less likely get corrupted from a hard shutdown (power off).
You can setup this option by editing the configuration file, Please refer the VMWare Article:
Comments