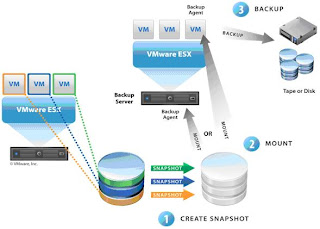
VCB (VMWare Consolidate Backup) Framework is backup proxy. VCB is NOT Backup software. It acts as a relay agent between the Virtual Machine and backup software. Generally, VCB would be installed as part of vCenter OR it can be installed on any standalone system as well.
VCB comprehensive software of Backup, Snapshot and mounting the virtual disk.
Download the VCB Framework from www.vmware.com download portal. Install it on a Windows XP system.
It install under the following path:
C:\Program Files\VMware\VMware Consolidated Backup Framework
Before take backup of the VMs, its virtual disk has to be mounted with our local system.
Enter following command in Command prompt to mount the Virtual Disk:
vcbmounter -h 172.17.42.55 -u -p -a name: -t file -r C:\VCC001 -m nbd
where as
-h can either ESX Host OR vCenter Server
-u Username
-p Password
-a VM parameters (name: enter VM name as per the inventory)
-t Fileflavor
-r Mount point
-m mode
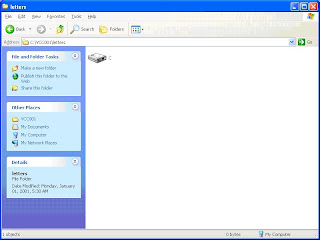
After run this command, you will folder called VCC001 on C Drive of local disk, open the VCC001 folder, you will see “C” drive of the VM as shown in the picture:
To UNMOUNT
It is necessary to unmount the mounted Virtual disk after backup done.
vcbmounter -h virtualcenter.domain.com -u username -p password -U c:\mnt\nameofthevm
Although NTBackup is unsupported for use with VCB, because it has no pre- and post-scripts, you can however use a batch file to mount the VMs, start NTBackup and Unmount those VMs.
@ECHO OFF
SET VCBFW="C:\Program Files\VMware\VMware Consolidated Backup Framework"
%VCBFW%\vcbmounter -h virtualcenter.domain.com -u username -p password -a name:%1 -t file -r c:\mnt\%1 -m nbd
ntbackup backup c:\mnt\%1\letters\c /j "%1 C-disk" /f "c:\ntbackup\%1.bkf" /snap:off /m normal
%VCBFW%\vcbmounter -h virtualcenter.domain.com -u username -p password -U c:\mnt\%1
Use Task Scheduler to schedule the backup using this batch file.
VCB with NTBackup is simple and costless solution for small enterprises and non-mission critical systems.
Some Pros and Cons:
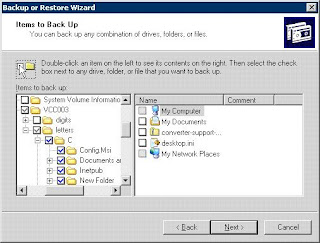
1. NTBackup thru Windows XP NOT allow us to select any specified folder to be backedup
2. NTBackup thru Windows 2003 allows us to take backup of any specified folder
3. The mounted Virtual Disk is READBLE ONLY
4. We need to manually schedule the backup jobs thru “Scheduled Tasks”
5. It can be security breach, if someone knows the username and password, they can easily use the VCB to mount the Virtual Disk and steal the data
6. We can’t do incremental and differential backup as the mounted virtual disk is read-only and NTBackup can’t set the archive bit.
7. VCB using Port 443
8. After unmount the virtual disk thru command, sometimes, its not removing the snapshots and delta disks from the particular Virtual Machine. Therefore, it not allows us to mount the same Virtual Disk again. Therefore, we used the following commands to remove the snapshots:
# vmware-cmd /vmfs// hassnapshot
If it return as 1, snapshot existing
# vmware-cmd /vmfs// removesnapshots
It should return null.
WARNING: Using this method to remove the snapshots may remove the other snapshots which are needed critically.
VCB comprehensive software of Backup, Snapshot and mounting the virtual disk.

Download the VCB Framework from www.vmware.com download portal. Install it on a Windows XP system.
It install under the following path:
C:\Program Files\VMware\VMware Consolidated Backup Framework
Before take backup of the VMs, its virtual disk has to be mounted with our local system.
Enter following command in Command prompt to mount the Virtual Disk:
vcbmounter -h 172.17.42.55 -u
where as
-h can either ESX Host OR vCenter Server
-u Username
-p Password
-a VM parameters (name: enter VM name as per the inventory)
-t Fileflavor
-r Mount point
-m mode
After run this command, you will folder called VCC001 on C Drive of local disk, open the VCC001 folder, you will see “C” drive of the VM as shown in the picture:


To UNMOUNT
It is necessary to unmount the mounted Virtual disk after backup done.
vcbmounter -h virtualcenter.domain.com -u username -p password -U c:\mnt\nameofthevm
Although NTBackup is unsupported for use with VCB, because it has no pre- and post-scripts, you can however use a batch file to mount the VMs, start NTBackup and Unmount those VMs.
@ECHO OFF
SET VCBFW="C:\Program Files\VMware\VMware Consolidated Backup Framework"
%VCBFW%\vcbmounter -h virtualcenter.domain.com -u username -p password -a name:%1 -t file -r c:\mnt\%1 -m nbd
ntbackup backup c:\mnt\%1\letters\c /j "%1 C-disk" /f "c:\ntbackup\%1.bkf" /snap:off /m normal
%VCBFW%\vcbmounter -h virtualcenter.domain.com -u username -p password -U c:\mnt\%1
Use Task Scheduler to schedule the backup using this batch file.
VCB with NTBackup is simple and costless solution for small enterprises and non-mission critical systems.
Some Pros and Cons:
1. NTBackup thru Windows XP NOT allow us to select any specified folder to be backedup
2. NTBackup thru Windows 2003 allows us to take backup of any specified folder
3. The mounted Virtual Disk is READBLE ONLY
4. We need to manually schedule the backup jobs thru “Scheduled Tasks”
5. It can be security breach, if someone knows the username and password, they can easily use the VCB to mount the Virtual Disk and steal the data
6. We can’t do incremental and differential backup as the mounted virtual disk is read-only and NTBackup can’t set the archive bit.
7. VCB using Port 443
8. After unmount the virtual disk thru command, sometimes, its not removing the snapshots and delta disks from the particular Virtual Machine. Therefore, it not allows us to mount the same Virtual Disk again. Therefore, we used the following commands to remove the snapshots:
# vmware-cmd /vmfs/
If it return as 1, snapshot existing
# vmware-cmd /vmfs/
It should return null.
WARNING: Using this method to remove the snapshots may remove the other snapshots which are needed critically.
Comments